Spring Home Renovation Journal: Track Your Flooring Upgrade, Design Choices, and Progress

Ready to turn a messy flooring project into a story you’ll love rereading?
Spring is finally here, the weather’s warming up, and the perfect excuse to finally replace that tired carpet or creaky hardwood. But before you swing that hammer, grab your favorite pen and a fresh spread in your bullet journal. A simple renovation journal can keep your budget in check, your timeline on track, and give you a gorgeous visual record of the transformation.
Why keep a renovation journal at all?
Because a renovation isn’t just a list of receipts—it’s a narrative. When you document each decision, you’ll be able to look back and see how a single flooring choice set the tone for the whole room. Plus, having everything written down means fewer surprise costs and fewer “wait, did we already buy that?” moments.
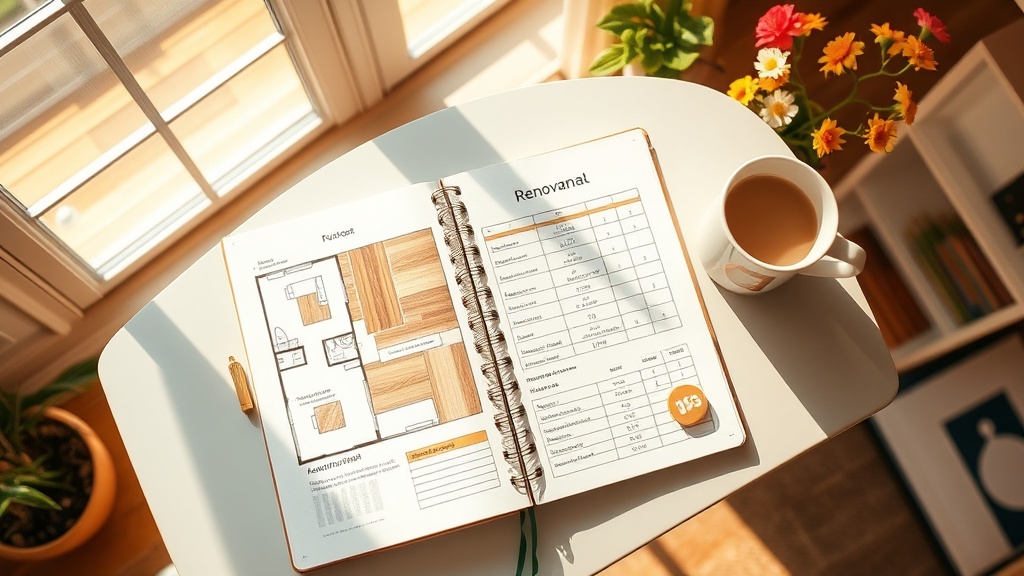
What should a flooring‑upgrade journal include?
- Project Overview: A one‑sentence mission (e.g., “Swap out living‑room carpet for reclaimed oak to create a brighter, more sustainable space”).
- Budget Tracker: A table for estimates vs. actual spend, broken down by material, labor, tools, and contingency.
- Timeline Grid: Weekly checkpoints—demolition, subfloor prep, installation, finishing touches.
- Design Inspiration: Swatch samples, Pinterest pins, or printed photos glued onto the page.
- Progress Photos: Small Polaroid‑style snapshots taken each week.
- Lesson Log: What worked, what didn’t, and tips for the next project.
How do I set up the first page?
Start with a clean two‑page spread. On the left, draw a simple floor plan—just the shape of the room and where the new flooring will go. On the right, create a “Budget & Timeline” table. Here’s a quick template I use (feel free to copy it into your own journal):
| Item               | Estimate | Actual | Notes |
|--------------------|----------|--------|-------|
| Materials (oak)    | $1,200   |        |       |
| Underlayment       | $150     |        |       |
| Labor (installer) | $800     |        |       |
| Tools & Supplies   | $100     |        |       |
| Contingency (10%)  | $225     |        |       |

| Week | Milestone                | ✔ |
|------|--------------------------|---|
| 1    | Demo old flooring        |   |
| 2    | Prep subfloor            |   |
| 3    | Install underlayment     |   |
| 4    | Lay new planks           |   |
| 5    | Finish & clean up        |   |
What tools help me stay organized?
Besides your trusty pen, I love a few digital helpers:
- Trello for a visual Kanban board of each task.
- Notion for storing receipts and product specs.
- Google Sheets for a live budget that syncs across devices.
But the heart of the system stays analog—your journal is the place you’ll flip back to for inspiration years from now.
How can I make the journal look as good as the finished floor?
Use a color palette that matches your new wood tones: warm neutrals, soft greens, and a pop of copper for hardware. Add washi tape borders that echo the grain pattern, and sprinkle tiny stickers of hammers, paint rollers, or tiny houseplants. The visual cues turn a boring spreadsheet into a mini‑gallery of your project.
Where do I find design inspiration?
Last spring I scrolled through Houzz’s flooring ideas gallery and saved three layouts that matched my color scheme. I printed the images and taped them onto the right side of my spread, so every time I opened my journal I could see the vision I was working toward.
What if the project goes off‑track?
When a delay happens—maybe a back‑ordered subfloor material—note it in the “Lesson Log” with a brief explanation and a new deadline. This not only keeps you honest but also creates a reference for future remodels. I’ve discovered that tracking these hiccups reduces stress because I know exactly why a timeline shifted.
How do I turn the journal into a keepsake after the project?
Once the floor is installed and the dust settles, scan each spread at 300 dpi and compile them into a PDF. I love adding a short intro page that recaps the whole journey, then sharing the PDF with friends who are planning their own upgrades. It’s a portfolio of my DIY confidence.
What’s the next step after flooring?
Use the same journal framework for the next room—whether it’s painting, lighting, or furniture placement. The habit of documenting every step makes each future project feel less daunting.
Quick recap
1️⃣ Sketch a simple floor plan.
2️⃣ Set up a budget & timeline table.
3️⃣ Capture inspiration with swatches and photos.
4️⃣ Log progress weekly, noting any delays.
5️⃣ Archive the spread as a PDF keepsake.
Ready to start your own renovation diary?
Grab a fresh bullet‑journal spread, pull out your favorite pen, and let the spring sunshine inspire your next flooring upgrade. Your future self will thank you when you can flip back and see exactly how you turned a plain room into a place you love.
Related Reading
- Spring Refresh: Revitalize Your Bullet Journal with Fresh Supplies — tips for choosing the perfect pens and tapes for a renovation spread.
- Evening Desk Reset: 5 Quick Steps for a Calm Creative Night — how to unwind after a long day of demolition.
- Morning Planning Ritual: The 5‑Minute Power‑Up Layout — start each renovation day with focus.
- Eco‑Friendly Spring Cleaning — sustainable cleaning tips for your newly installed floor.
Sources: The New York Times – Oscars Red Carpet Floor Upgrade, HomeAdvisor – Flooring Installation Cost Guide, Houzz – Flooring Ideas.