Mastering the Art of Kintsugi-Style Gold Repair

There is a profound, quiet beauty in the broken. In my professional life as a project manager, I spend a significant amount of time managing "breaks"—the gaps in a workflow, the missed deadlines, or the unexpected pivots that disrupt a perfect plan. But in my personal creative practice, I have learned to view these disruptions differently. I look to the Japanese philosophy of wabi-sabi, which finds beauty in imperfection and transience, and specifically to the art of Kintsugi.
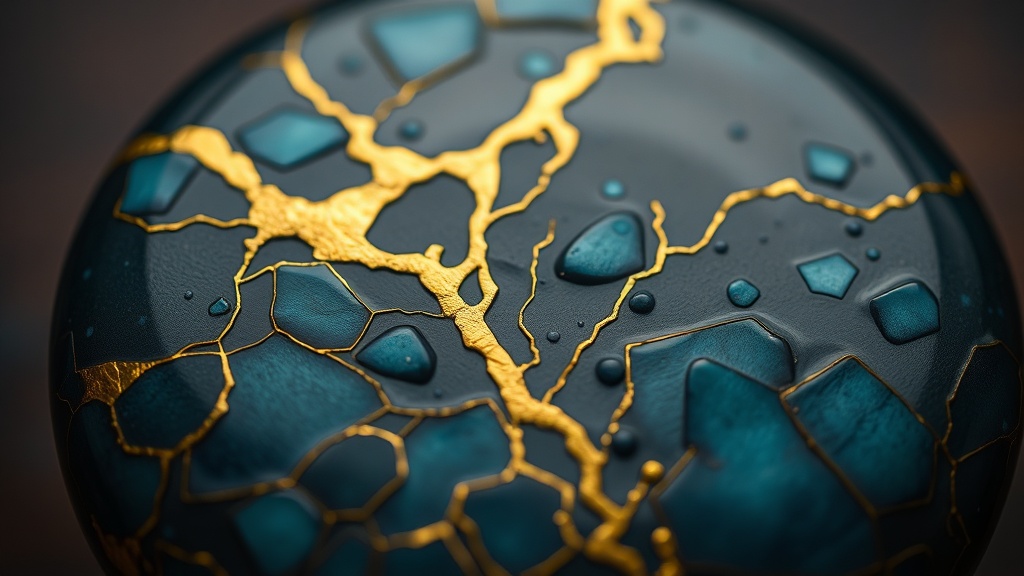
Kintsugi, or "golden joinery," is the centuries-old practice of repairing broken pottery with lacquer mixed with powdered gold, silver, or platinum. Instead of hiding the cracks, the artist highlights them, treating the breakage and repair as a vital part of the object's history. It tells a story of resilience. To me, this is the ultimate metaphor for a well-lived life: our scars and "cracks" do not diminish our value; they make us unique and even more precious.
In this guide, I will walk you through the process of mastering a modern, accessible version of Kintsugi. While traditional Kintsugi uses urushi lacquer (which can be difficult to work with and even toxic), I will teach you a method using food-safe epoxy and gold mica powder. This approach is perfect for those who want to bring a sense of intentionality and artful repair to their homes without needing a professional studio.
The Philosophy of Intentional Repair
Before we touch a single shard, we must prepare our mindset. Kintsugi is not a rushed task. It is a meditative process that requires patience, precision, and a high degree of organization. Much like how I approach a journal reset to boost productivity, this craft requires you to slow down and respect the rhythm of the material. You cannot rush the drying time of an adhesive, just as you cannot rush the seasonal transitions of your life.
As you begin, think of the broken piece not as "trash" to be discarded, but as a project in transition. Whether it is a ceramic mug that chipped during a busy morning or a decorative bowl that met a hard floor, the goal is to honor the piece's journey. This mindset aligns beautifully with the concept of reducing your carbon footprint through mindful consumption. Repairing what we already own is one of the most sustainable ways to practice a low-impact lifestyle.
Gathering Your Toolkit
To achieve a professional-grade finish, you will need specific materials. I recommend setting up a dedicated workspace—a clean, well-lit area that allows you to focus. Organization is key here; a cluttered workspace leads to a cluttered mind and, potentially, a messy repair.
Essential Materials:
- The Broken Ceramic: Ideally a piece with clean, sharp breaks. Avoid pieces with many tiny, crumbly shards.
- Two-Part Clear Epoxy: Look for a high-strength, clear-drying epoxy. Ensure it is non-toxic if you intend to use the piece for decor.
- Gold Mica Powder: This provides that signature metallic luster. You can find various shades of gold, bronze, or even silver.
- Mixing Tools: Small wooden sticks or silicone spatulas for mixing the epoxy and powder.
- Precision Applicators: Toothpicks or fine-tipped brushes for applying the mixture to the edges.
- Surface Protection: A silicone mat or parchment paper to catch any drips.
- Isopropyl Alcohol: For cleaning the edges of the broken pieces.
- Small Scale or Measuring Spoons: To ensure an accurate ratio of epoxy to powder.
Step-by-Step: The Kintsugi Process
Step 1: Preparation and Cleaning
The most critical step in any repair—whether it's a ceramic vessel or a project timeline—is the preparation. If the edges of your broken pieces are dusty or oily, the epoxy will not bond correctly. Use a soft brush to remove any debris, then wipe the broken edges thoroughly with isopropyl alcohol. Let them air dry completely. Any moisture trapped in the cracks will ruin the finish.
p>Step 2: The "Dry Fit" Test
Before applying any adhesive, perform a "dry fit." Take all the pieces and fit them together like a puzzle. This allows you to see exactly how the pieces interact and helps you visualize where the gold lines will eventually sit. This step is vital for planning. Much like how I use creative layouts for holiday planning, you are mapping out the visual outcome before the permanent work begins.
Step 3: Mixing the "Golden" Adhesive
In a small mixing container, combine your two-part epoxy. Follow the manufacturer's instructions for the exact ratio—usually 1:1. Once the epoxy is fully mixed and clear, add your gold mica powder.
Pro-Tip: Do not over-add the powder. You want a thick, paste-like consistency. If the mixture is too runny, it will bleed out of the cracks and create a mess. If it is too thick, it won't flow into the crevices. Aim for a texture similar to heavy cream or soft butter.
Step 4: Application
There are two ways to approach this: the "Edge Method" or the "Infill Method."
- The Edge Method: Apply a thin layer of the gold-infused epoxy directly onto one edge of a broken piece. Use a toothpick to ensure the paste is seated deeply into the crack.
- The Infill Method: If the break is wider, you can apply the epoxy to both sides of the crack to ensure a seamless bond.
Once the adhesive is applied, carefully press the pieces together. Hold them firmly for several minutes. If the piece is large or complex, you may need to use painter's tape to hold the pieces in place while they set. Be extremely careful not to get excess epoxy on the "good" surfaces of the ceramic. If you do, wipe it away immediately with a cotton swab dipped in alcohol.
Step 5: The Curing Phase
Patience is your greatest ally. Most epoxy-based repairs require at least 24 hours to cure fully. Do not attempt to move or use the piece during this time. I find that this waiting period is a great time to engage in other creative outlets, perhaps by working on an intentional bullet journal spread to reflect on the progress of your project.
Troubleshooting and Refinement
Sometimes, the gold line isn't as smooth as you envisioned. If you notice a bump or a dried drip, you can carefully scrape it away once it is fully cured using a very fine-grit sandpaper or a precision carving tool. However, I often find that these small irregularities add to the "hand-made" charm of the piece. In Kintsugi, perfection is the enemy of beauty.
"The crack is where the light gets in." — While often attributed to Leonard Cohen, this sentiment is the heart of Kintsugi. The repair is not a failure of the object, but an evolution of it.
Common Mistakes to Avoid:
- Using too much epoxy: This leads to "oozing" and a messy, thick line rather than a delicate gold vein.
- Incomplete mixing: If the epoxy isn't fully mixed with the hardener, it will remain tacky and never truly set.
- Ignoring the "Dry Fit": Skipping the test run often leads to pieces that don't align, making the repair frustrating and difficult.
Integrating Art into Daily Rituals
Once your piece is repaired, it is ready to return to your daily life. Perhaps it is a tea bowl that you will use during your morning mindfulness practice, or a vase that will hold flowers on your desk. By repairing this object, you have transformed a moment of loss into a moment of creation.
As you move through your week, I encourage you to look for other ways to blend the functional with the beautiful. Whether you are organizing your digital reading platforms—much like the shifts seen in modern book celebrations—or simply tidying your workspace, remember that there is art in the details. The way we care for our belongings and our time is a reflection of how we care for ourselves.
Kintsugi teaches us that we don't have to be "whole" to be beautiful. We just have to be willing to embrace our history, highlight our strengths, and continue to create. Happy crafting!
Steps
- 1
Clean the Broken Edges
- 2
Mix the Adhesive and Gold Pigment
- 3
Apply the Mixture to the Cracks
- 4
Set and Polish