5 Essential Watercolor Techniques Every Beginner Should Master

Wet-on-Wet: Creating Soft, Flowing Blends
Wet-on-Dry: Precision and Control
Dry Brush: Adding Texture and Detail
Glazing: Building Depth with Transparent Layers
Graded Wash: Mastering Smooth Transitions
Watercolor painting rewards patience with luminosity that's nearly impossible to replicate with other mediums. This guide breaks down five foundational techniques that separate confident beginners from frustrated ones—no art school required. Master these methods and those intimidating blank pages in your sketchbook become invitations, not obstacles.
What Are the Basic Watercolor Techniques Every Beginner Needs?
The five core techniques are wet-on-wet, wet-on-dry, dry brush, glazing, and lifting. Each serves a distinct purpose—building backgrounds, adding details, creating texture, deepening colors, or correcting mistakes.
Here's the thing about watercolor: it's not about controlling the paint so much as understanding how water behaves. The paper, brush, and pigment all dance together. Once you learn the steps, the dance becomes intuitive.
Most beginners grab a cheap set from the craft store and wonder why their paintings look muddy. (Spoiler: it's not the paint's fault.) Technique matters more than materials—but decent supplies don't hurt. Start with cold-press paper from Arches (140 lb weight is forgiving) and a few round brushes in sizes 4, 8, and 12. Princeton Neptune brushes hold water beautifully without breaking the budget.
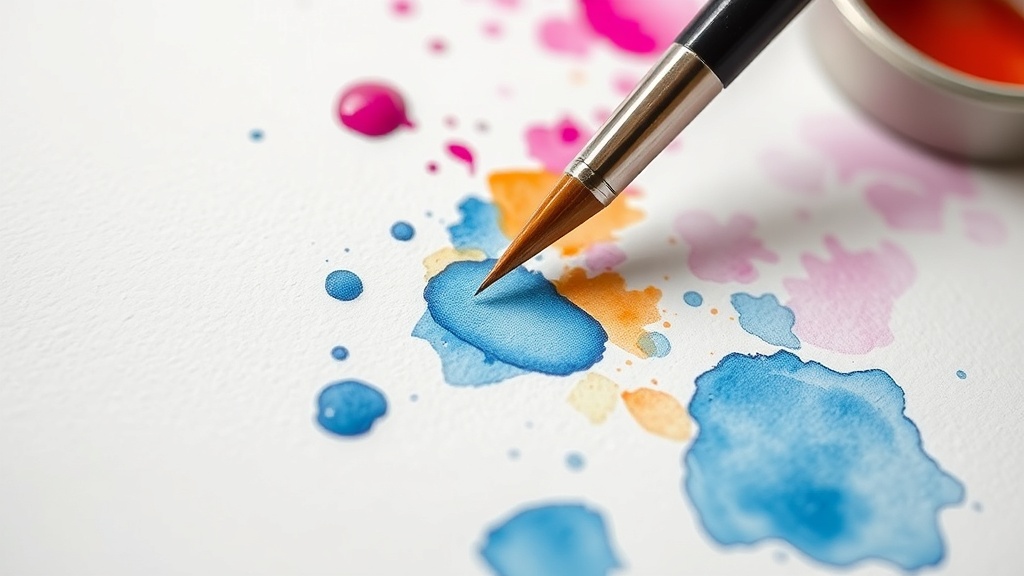
Wet-on-Wet: The Foundation of Soft Blends
This technique involves applying wet paint to wet paper. The pigment spreads organically, creating soft edges and seamless gradients—perfect for skies, water, or atmospheric backgrounds.
To execute it properly:
- Tape down your paper to a board (watercolor buckles as it dries)
- Apply clean water with a large brush in broad strokes
- Drop diluted pigment onto the wet surface
- Watch the color bloom—literally. Watercolorists call this the "blossom" or "cauliflower" effect
- Tilt the paper to guide the flow
The catch? Timing. Too wet and everything turns to soup. Too dry and you lose that signature softness. Practice on scrap paper first. Aim for a sheen on the surface—no puddles, no dry patches.
Winsor & Newton's Cotman series offers affordable tubes for experimentation. Burnt sienna and ultramarine blue create gorgeous atmospheric washes when combined wet-on-wet.
Wet-on-Dry: Control and Precision
Apply wet paint to dry paper for crisp edges and defined shapes. This technique builds the structure of your painting—details, hard shadows, botanical illustrations.
Load your brush with pigment (not too watery) and make deliberate marks. The paint stays exactly where placed. Layer multiple passes as each dries completely.
Watercolor purists often snobbishly dismiss this as "too controlled." Ignore them. The best paintings combine both approaches—wet-on-wet for atmosphere, wet-on-dry for definition. Think of it as sketching with color.
How Do You Create Texture in Watercolor Paintings?
Texture transforms flat washes into compelling artwork. The dry brush technique—using minimal water and dragging pigment across paper texture—creates broken, scratchy lines perfect for bark, fur, or weathered wood.
Press a nearly-dry brush (damp, not wet) lightly across the paper's surface. The bristles skip over the hills of the paper texture, depositing pigment only in the valleys. Practice pressure control. Heavy handed? You'll get solid lines. Too light? Nothing happens.
Other texture methods worth exploring:
- Salt sprinkling: Drop coarse sea salt onto wet paint. It absorbs water and pushes pigment away, creating starburst patterns
- Plastic wrap: Press cling film onto wet washes, let dry completely, then peel
- Masking fluid: Apply liquid latex (like Daniel Smith's Masking Fluid) to preserve white areas before painting over them
Each texture technique requires planning—watercolor is uniquely unforgiving of poor sequencing. Work light to dark, big to small. Always.
Glazing: Building Depth Through Layers
Glazing means applying thin, transparent washes over completely dry layers. This technique builds depth, adjusts color temperature, and unifies compositions. It's how watercolorists achieve those glowing, jewel-like finishes that seem to radiate from within.
Mix your pigment with plenty of water—the wash should look too light when wet. It dries darker. Apply evenly with a soft brush. Wait until bone dry before adding another glaze. (Impatience ruins more paintings than lack of skill.)
Some pigments glaze better than others. Staining colors like phthalo blue or quinacridone magenta become permanent immediately—layering shifts hue but won't lift previous layers. Non-staining pigments (cadmiums, ochres) remain workable longer.
| Glazing Approach | Best For | Drying Time |
|---|---|---|
| Single pigment layers | Deepening value, temperature shifts | 15-20 minutes |
| Complementary glazes | Creating neutrals, shadow colors | 20-30 minutes |
| Multiple alternating layers | Complex skin tones, atmospheric depth | Full day between sessions |
Worth noting: over-glazing produces chalky, lifeless results. Three to four layers usually max out the luminosity. Plan accordingly.
What Is Lifting and Why Does It Matter for Beginners?
Lifting removes wet or dry pigment from paper to create highlights, correct mistakes, or suggest texture. Unlike oil or acrylic where you paint light over dark, watercolor preserves the white of the paper—or adds it back through lifting.
For wet lifting: blot with paper towel, cotton swab, or dry brush while paint is still damp. Softer edges result.
For dry lifting: dampen a stiff brush (like a synthetic flat), gently scrub the area, then blot with tissue. This reactivates dried pigment and lifts it away. Some papers handle scrubbing better than others—Arches and Saunders Waterford withstand abuse that would destroy cheaper alternatives.
Here's the thing about "mistakes" in watercolor: they're rarely fatal. Turn blooms into flowers. Make accidental hard edges into branches. The medium teaches improvisation.
Putting It All Together: A Simple Exercise
Practice these techniques in one small painting. Paint a simple landscape:
- Wet-on-wet wash for a sunset sky
- Wet-on-dry for distant hills
- Dry brush for foreground grass texture
- Glazing to deepen shadow areas
- Lifting to create cloud highlights
Limit your palette to three colors. (Warm and cool primaries work beautifully—try new gamboge, permanent rose, and French ultramarine.) Restrictions breed creativity.
"Watercolor is the only medium where the white comes from the paper, not the paint. That negative space—that absence—is where the magic lives."
Paint small at first. Five-by-seven inches removes the intimidation factor. Fill a sketchbook with experiments rather than attempting gallery-worthy pieces immediately. The Moleskine Watercolor Album handles light washes admirably for on-the-go practice.
Join a local watercolor society or online community (Reddit's r/Watercolor offers surprisingly constructive feedback). Seeing how others solve problems accelerates learning faster than any tutorial.
That said, technique alone won't make compelling art. Observation matters more. Study how light falls on objects. Notice color temperature shifts. Carry a pocket notebook for sketches—thumbnail compositions separate strong ideas from weak ones before committing to paint.
Watercolor demands surrender. The paint goes where gravity and water take it. Your job isn't controlling every molecule—it's creating conditions for happy accidents, then knowing which ones to keep.